

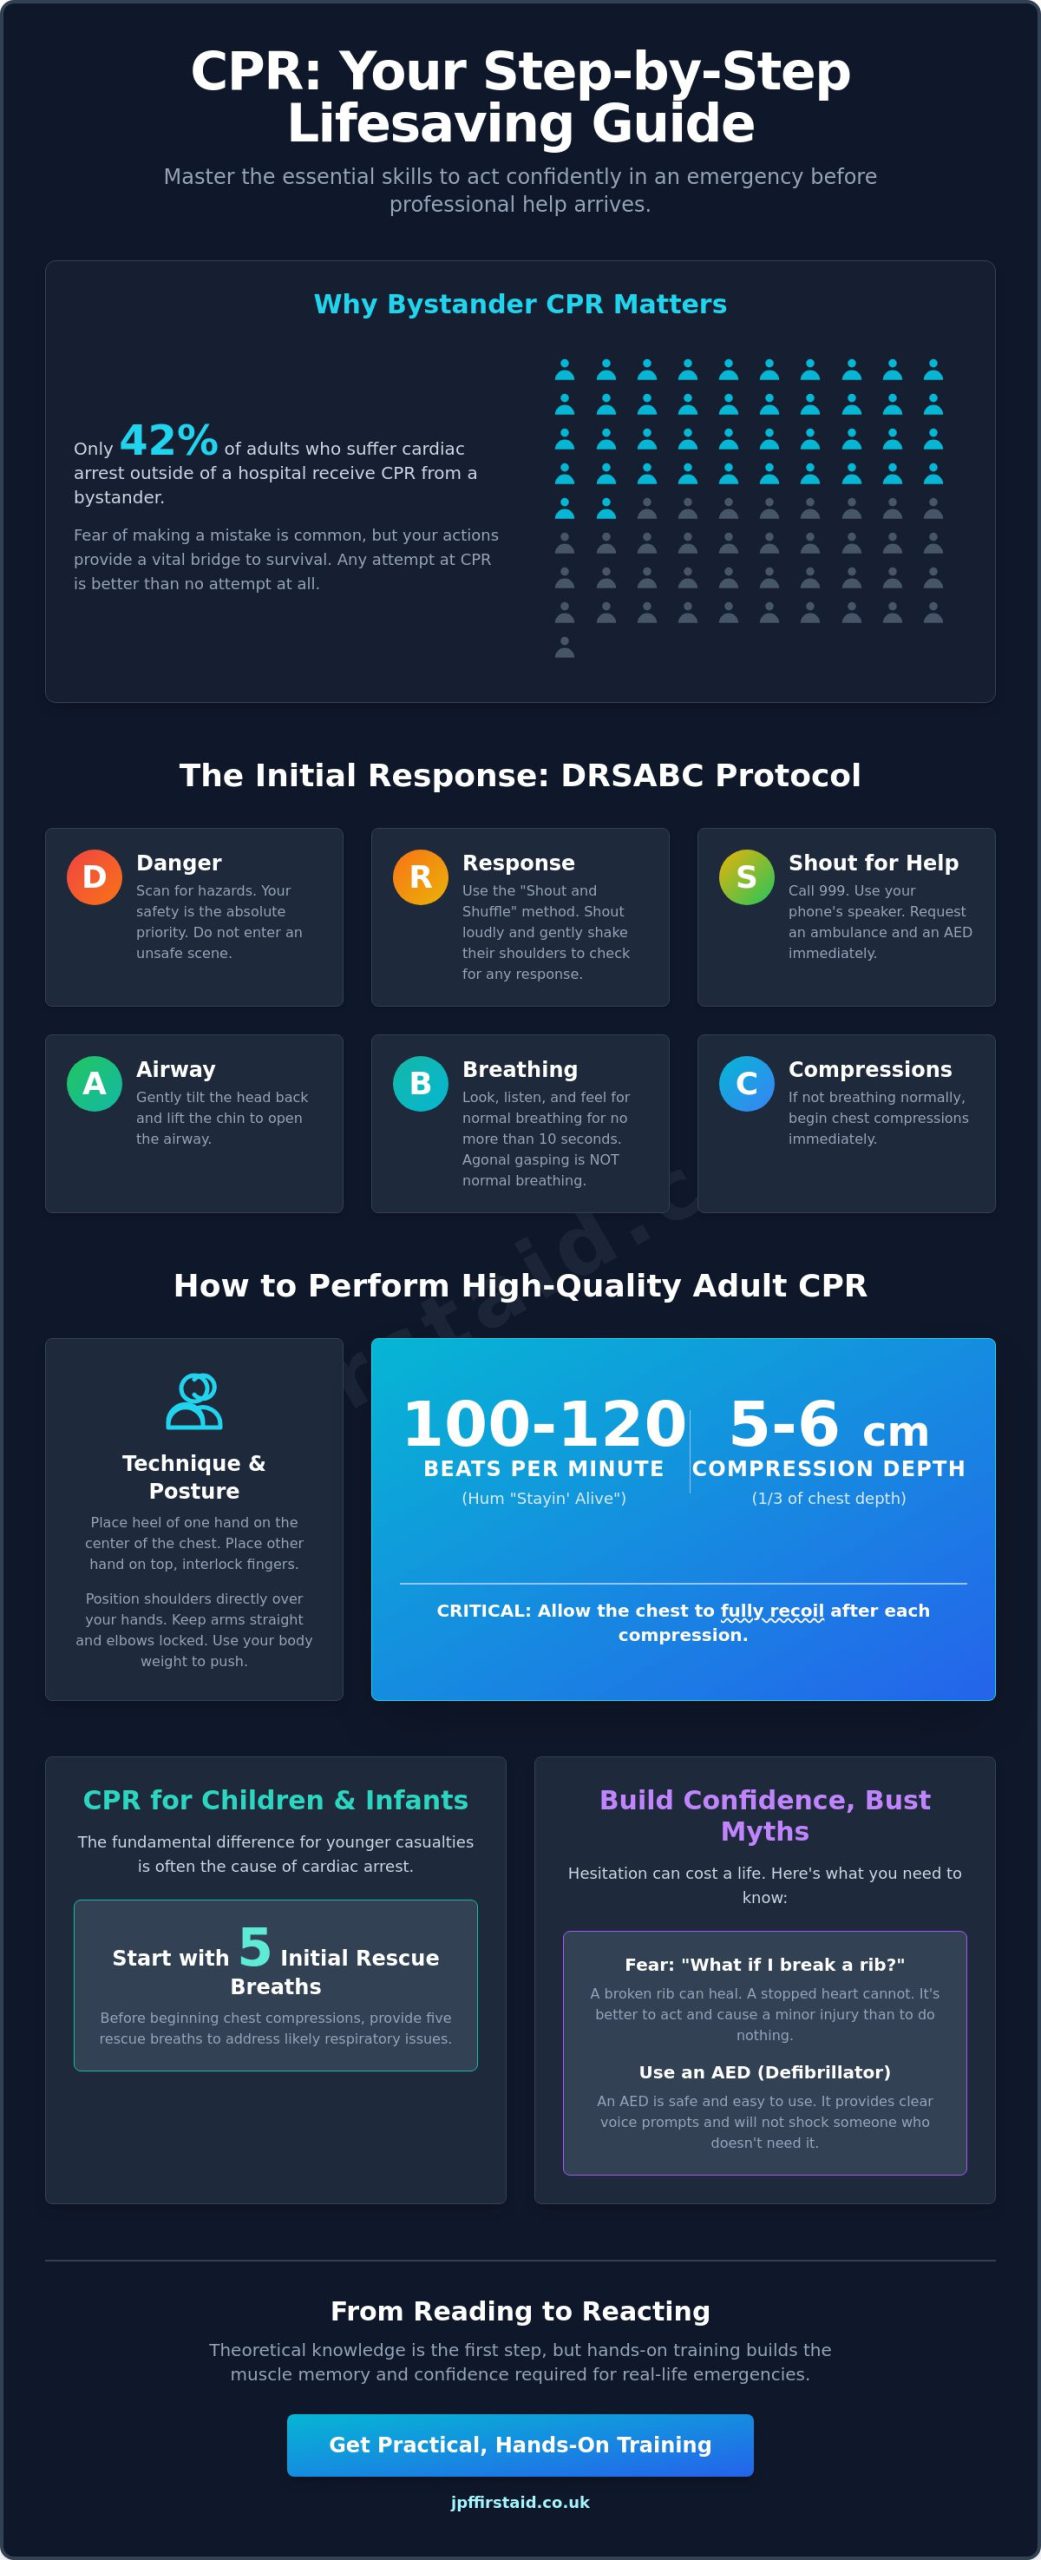
Only 42% of adults who experience cardiac arrest outside of a hospital setting receive CPR from a bystander. This statistic often reflects a common fear of making a mistake or causing further injury in a crisis. If you’ve ever worried about breaking a rib or getting the rhythm wrong, you’re not alone. Learning how to perform cpr steps is less about perfect medical precision and more about having the confidence to provide a vital bridge to professional help.
We know that the pressure of an emergency can make your mind go blank, especially when you’re trying to recall the difference between adult and child protocols. It’s natural to feel hesitant, but you don’t need to be a doctor to save a life. This guide promises to build your confidence through a clear, expert-led mental checklist designed for real-world situations. You’ll master the essential, life-saving techniques with clarity, ensuring you’re ready to act before paramedics arrive. We’ll walk you through the updated 2026 guidelines, including the 100 to 120 compression rate and the unified Chain of Survival, so you can feel like a capable partner in your community’s safety.
Key Takeaways
- Learn the DRSABC protocol to secure the scene and correctly assess a casualty using the “Shout and Shuffle” method.
- Discover exactly how to perform cpr steps for adults, focusing on the correct hand placement and the rhythm needed for high-quality chest compressions.
- Understand the critical differences in child and infant CPR, including why starting with five rescue breaths is vital for younger casualties.
- Gain the confidence to use an Automated External Defibrillator (AED) and learn why common fears, like breaking a rib, shouldn’t stop you from acting.
- Move beyond theoretical knowledge to understand how practical training builds the muscle memory required for real-life emergencies.
The Initial Response: Scene Safety and the DRSABC Protocol
When you encounter someone who has collapsed, your adrenaline will spike. It’s a natural reaction. However, the first of the how to perform cpr steps isn’t actually touching the casualty; it’s looking around you. This initial phase is governed by the DRSABC protocol, a structured mental checklist that keeps you and the casualty safe while setting the stage for life-saving action. Understanding these preliminaries is just as vital as the compressions themselves.
Danger and Response: Securing the Area
You can’t help anyone if you’re injured yourself. Take a three-second “tactical pause” to scan for immediate hazards. Look for live electrical wires, moving traffic, or the smell of gas. If the area is unsafe, don’t enter. Instead, call for professional help and wait for the scene to be secured. Your safety is the absolute priority in any emergency situation.
Once the scene is safe, check for a response using the “Shout and Shuffle” method. Approach the person, shout loudly in both ears, and gently but firmly shake their shoulders. You’re looking for any sign of life, such as a groan, eye movement, or purposeful limb movement. If there is no response, the person is unconscious. Watch closely for “agonal gasping,” which looks like infrequent, noisy, or labored breathing. This isn’t normal breathing; it’s a sign of cardiac arrest, and it means Cardiopulmonary resuscitation (CPR) is required immediately.
Calling for Help: What to Tell the Emergency Operator
If you are alone, use your mobile phone’s loudspeaker. This allows you to start the next steps while talking to the 999 operator. Tell them clearly that you have a casualty who is unconscious and not breathing. Request an ambulance and an Automated External Defibrillator (AED) immediately. The operator will stay on the line with you, providing a steady rhythm for compressions and offering psychological support until paramedics arrive. If there are bystanders, point to a specific person and tell them to find the nearest AED while you stay with the casualty.
To check for normal breathing, tilt the head back slightly to open the airway. Place your ear close to their mouth and nose while looking down at their chest. Spend no more than ten seconds doing this. You are looking for the chest to rise and fall, listening for breath sounds, and feeling for breath on your cheek. If they aren’t breathing normally, or if you’re in any doubt, you must begin the next phase of how to perform cpr steps. These skills are a core part of our Basic Life Support Qualifications and Emergency First Aid At Work (Level 3) training, where we help you practice these movements until they feel like second nature.
Mastering the Mechanics: How to Perform CPR on an Adult
Once you’ve confirmed the casualty is unconscious and not breathing, you must act as their external heart. This is the most physically demanding part of the process, but don’t let that intimidate you. Your goal is to keep oxygenated blood flowing to the brain until professional help arrives. When you understand how to perform cpr steps with the right technique, you’ll find that your body weight does most of the hard work for you.
Start by kneeling beside the person’s chest. Place the heel of one hand in the centre of their chest, right on the breastbone. Place your other hand on top and interlock your fingers, making sure your fingers stay off the ribs. Following the CPR steps from the Mayo Clinic ensures you are using the most effective, evidence-based methods available today. While reading about these steps is a great start, practicing on a manikin during our Adult, Child and Baby First Aid course is where true confidence is built.
Perfecting Your Compression Technique
Position yourself so your shoulders are directly over your hands. Keep your arms straight and your elbows locked. By using your upper body weight to push rather than just your arm muscles, you’ll be able to maintain the necessary force for longer. You need to push down to a depth of 5 to 6cm. This specific depth is required to physically squeeze the heart against the spine, forcing blood out to the rest of the body. After every push, you must allow the chest to fully recoil. This means letting the chest come all the way back up to its natural position so the heart can refill with blood before the next compression.
The rhythm is just as important as the depth. Aim for a steady pace of 100 to 120 beats per minute. Many people find it helpful to hum “Stayin’ Alive” by the Bee Gees to keep the correct tempo. If you feel uncomfortable or haven’t been trained in rescue breaths, you can perform “hands-only” CPR. Continuous, high-quality chest compressions are significantly better than doing nothing at all.
Rescue Breaths: When and How to Deliver Them
If you are trained and willing, combine compressions with rescue breaths at a ratio of 30:2. This means after every thirty compressions, you deliver two breaths. To do this, use the head-tilt, chin-lift method to open the airway. Pinch the person’s nose shut, take a normal breath, and make a complete seal over their mouth. Each rescue breath should last for exactly one second. Watch for the chest to rise as you breathe in, then let it fall before delivering the second breath. If the chest doesn’t rise, check the airway for obstructions and ensure the head is tilted back sufficiently before your next attempt. Speed is key, so don’t spend more than ten seconds trying to deliver the two breaths before returning to compressions.
Paediatric Variations: CPR Steps for Children and Infants
Helping a child in distress is perhaps the most daunting challenge any first aider can face. The psychological weight of the situation is immense, and it is completely normal to feel a surge of panic. However, children are remarkably resilient. Your calm, decisive action is their best chance at a positive outcome. Most paediatric cardiac arrests don’t actually start with a heart problem; they usually stem from a respiratory issue, such as choking, near-drowning, or a severe asthma attack. Because of this, the sequence for how to perform cpr steps changes to prioritize oxygen delivery right from the start.
While the core rhythm of 100 to 120 compressions per minute remains the same as adult CPR, your approach must be tailored to their smaller, more fragile frames. If you are a parent, teacher, or childcare professional, understanding these variations is a vital part of your toolkit for protecting the young people in your care. By following a slightly modified protocol, you address the underlying lack of oxygen that usually causes a child’s heart to stop.
CPR for Children (Aged 1 to Puberty)
For children, the process begins with five initial rescue breaths before you start any compressions. This “oxygen boost” is critical because their blood oxygen levels are likely depleted. After these five breaths, you move into the standard cycle of 30 compressions followed by two breaths. Depending on the child’s size, you might only need to use the heel of one hand to reach the required depth. Aim to compress the chest by about one-third of its total depth. If the child is larger or you are struggling to reach that depth, don’t hesitate to use two hands as you would for an adult. The goal is effective circulation, and your Emergency Paediatric First Aid training will help you gauge the right amount of pressure for different ages.
Infant CPR (Under 1 Year Old)
Infants require an even gentler and more specific touch. Their airways are incredibly narrow and flexible, so you must keep their head in a “neutral” position. Tilting it back too far can actually kink the airway and block the flow of air entirely. Instead of using your whole hand, deliver compressions using just two fingers in the centre of the chest, again aiming for one-third of the chest depth. When giving rescue breaths to a baby, your mouth should create a seal over both their nose and mouth simultaneously. These nuances are covered extensively in our Paediatric First Aid (Level 3) course, where we provide the hands-on practice needed to master these delicate techniques without fear. Knowing how to perform cpr steps for the smallest casualties ensures you are a truly capable guardian in your community.
Using an AED and Overcoming the Fear of Causing Harm
Fear is the single biggest hurdle between a bystander and a life saved. It’s natural to worry about making a mistake or causing further injury. However, when you’re following the how to perform cpr steps, you must remember that the person you’re helping is in a state of clinical death. Their heart has stopped. You cannot make their situation worse, but by acting, you give them a fighting chance at survival. Your intervention acts as a vital bridge until professional help arrives.
One of the most common anxieties involves the physical nature of compressions. You might have heard stories about ribs breaking. It’s true that in high-quality CPR, the cartilage or a rib might crack under the pressure required to reach a 5 to 6cm depth. While this feels alarming, a broken rib is a small, healable price to pay for a life. In the UK, you are protected by the law when acting in good faith to assist in an emergency. Focus on the rhythm and the goal: keeping oxygen moving to the brain.
The AED: Your Most Reliable Partner
An Automated External Defibrillator (AED) is a sophisticated piece of technology, but it’s built for the general public. It’s designed to be used by anyone, regardless of their medical background. Once you turn the device on, it takes over the “thinking” for you. A calm, clear voice will guide you through exactly what to do. It will analyze the casualty’s heart rhythm and will only deliver a shock if it’s medically required. You cannot “accidentally” shock someone who doesn’t need it.
When an AED arrives, don’t stop your compressions immediately. Have a bystander unpack the device, turn it on, and prepare the pads while you continue the how to perform cpr steps. Follow these simple prompts:
- Attach the adhesive pads to the person’s bare chest as shown in the diagrams.
- Ensure nobody is touching the casualty when the device says “analysing rhythm.”
- Press the shock button only if the AED instructs you to do so.
For a more detailed look at how these devices integrate with emergency care, you can explore our Basic Life Support Training guide. Understanding the “why” behind the technology can significantly lower your stress levels during a real event.
The Good Samaritan Mindset
Managing the rush of adrenaline is part of the process. If you feel overwhelmed, lean on the emergency operator’s instructions or the AED’s voice prompts. They are there to keep you on track. Remember that doing something is always better than doing nothing. Your willingness to step forward is what makes the difference. If you’d like to practice these skills in a friendly, low-pressure environment, our Basic Life Support Qualifications are designed to turn that initial fear into capable, life-saving confidence.
From Reading to Reacting: Why Hands-On Training is Essential
Reading a guide like this is a fantastic starting point for your journey. It provides the mental framework and the logical sequence of actions you’ll need in a crisis. However, there’s a significant difference between understanding the theory and having the physical muscle memory to act when seconds count. When you’re learning how to perform cpr steps, the transition from a screen to a real-life situation requires a level of confidence that only comes from practice. Our goal is to move you from being a passive reader to a capable, active responder.
In a real emergency, your brain might struggle to recall specific ratios or depths because of the adrenaline rush. This is where hands-on training becomes your greatest asset. By practicing the physical movements in a safe environment, you’re training your body to react even when your mind feels clouded. At JPF First Aid, we pride ourselves on creating a relaxed, non-intimidating atmosphere. We believe that learning these serious skills should be an enjoyable, interactive experience that leaves you feeling empowered rather than overwhelmed.
Building Muscle Memory with Manikins
Practicing on a manikin allows you to feel the resistance of a human chest. You’ll learn exactly how much pressure is needed to achieve that vital 5 to 6cm depth we’ve discussed. Without this physical feedback, most people tend to push too lightly, which limits the effectiveness of the compressions. Our experienced trainers provide real-time feedback, ensuring your hand placement and rhythm are perfect. If you’re unsure which path to take, our guide on First Aid Courses can help you find the perfect match for your needs.
Choosing the Right Course for You
The right training depends on your specific environment and the people you spend the most time with. For general workplace safety and meeting regulatory requirements, our Emergency First Aid at Work course is a popular and thorough option. It covers all the essentials, ensuring you can handle a wide range of incidents with professional poise. If you’re a parent, teacher, or childminder, you might find our Paediatric First Aid training more relevant, as it focuses on the specific biological needs of children and infants.
Taking the next step toward becoming a certified lifesaver is a decision you’ll never regret. Whether it’s for your career or your family’s peace of mind, gaining a regulated qualification ensures you’re prepared for the unexpected. You’ve already taken the first step by learning how to perform cpr steps today. Now, let’s build the confidence to put that knowledge into action. We’re here to mentor you every step of the way, providing the skills that turn bystanders into heroes.
Take the Next Step Toward Saving a Life
You now have a clear mental checklist for responding to an emergency, from securing the scene with the DRSABC protocol to delivering high-quality chest compressions. We’ve explored the nuances of how to perform cpr steps for both adults and children, and why an AED is a reliable partner that handles the complex thinking for you. While these guides provide the essential theory, the true power to act comes from the deep confidence built through physical practice and expert feedback.
As a multi-award-winning training provider, we offer Ofqual regulated qualifications in a relaxed, interactive, and non-intimidating environment. We focus on making the learning process enjoyable so that these vital skills stay with you long after the session ends. Whether you’re a parent, a professional, or a concerned community member, we’re here to help you bridge the gap between reading a guide and reacting with poise.
Book Your First Aid Course and Build the Confidence to Save a Life today. You have the potential to be the difference in someone’s most critical moment, and we’re ready to help you get there.
Frequently Asked Questions
Can I be sued for performing CPR in the UK if I am not trained?
You are protected by law when you act in good faith during an emergency. In the UK, the Social Action, Responsibility and Heroism Act 2015 ensures that courts consider whether you were acting for the benefit of society. Since a person in cardiac arrest is clinically dead, your intervention is seen as a helpful attempt to save a life rather than a source of harm.
What happens if I accidentally break a rib while performing chest compressions?
If you hear a crack or feel a rib break, you must continue with your compressions. This is a common occurrence during high-quality CPR because of the 5 to 6cm depth required to effectively pump the heart. A broken rib is a minor, healable injury compared to the alternative of permanent brain damage or death, so don’t let it stop your efforts.
How long should I continue performing CPR before the ambulance arrives?
You should continue the how to perform cpr steps until professional help arrives and takes over, the casualty starts to show signs of life, or you become physically exhausted. If other bystanders are present, swap every two minutes to maintain the quality of compressions. The goal is to provide a continuous bridge of support until the paramedics can provide advanced care.
Is hands-only CPR as effective as CPR with rescue breaths?
Hands-only CPR is highly effective and significantly better than doing nothing at all. While the 30:2 ratio of compressions to breaths is the gold standard for trained responders, continuous chest compressions keep oxygenated blood moving to the brain. If you aren’t trained or feel uncomfortable with rescue breaths, focusing solely on high-quality compressions is a life-saving decision.
What should I do if the casualty starts to vomit during CPR?
If the casualty vomits, roll them onto their side away from you to allow the airway to clear naturally. Use your fingers to remove any visible obstructions if it’s safe to do so, then roll them back onto their back and resume compressions immediately. This is a common biological reaction during resuscitation and shouldn’t cause you to stop your efforts for more than a few seconds.
Can I perform CPR on someone who is pregnant?
Yes, you must perform CPR on a pregnant person if they are unconscious and not breathing. The how to perform cpr steps remain largely the same, though you should place your hands slightly higher on the breastbone. If a second bystander is available, ask them to gently push the person’s bump toward the left side to help improve blood flow back to the heart.
What is the correct CPR rhythm and how can I remember it?
The correct rhythm is between 100 and 120 compressions per minute. You can easily remember this by following the beat of well-known songs like “Stayin’ Alive” by the Bee Gees or “Baby Shark.” Keeping this steady, fast pace is essential for maintaining enough pressure to move blood through the circulatory system until professional medical help arrives on the scene.
Should I stop CPR if I see a defibrillator being brought to the scene?
Don’t stop your compressions until the Automated External Defibrillator (AED) is turned on and the pads are ready to be applied. Even then, you only pause when the device specifically tells you to “stand clear” while it analyses the heart rhythm. Minimising interruptions to chest compressions is one of the most important factors in a successful resuscitation attempt.
Recent Comments